Before creating Virtual Disks (VDisks) ensure that physical storage has been configured first. See Configuring Physical Storage
- To create a new VDisk click on ‘Virtual Disks” menu and then click on the “Add VDisk” button.
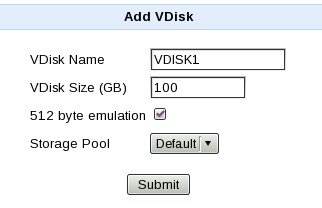
- In the Add VDisk form as shown in the figure below specify a name for the VDisk
- Specify the size of the VDisk in GB. VDisk size is limited to a maximum of 64 TB (65536 GB)
- Select "512 byte emulation" if the sector size presented by the VDisk should be 512 bytes and not 4096
- Select the pool for the VDisk. Only storage pools with configured disks will be listed here.
- Click on Submit

To view the current configured VDisks click on “Virtual Disks’ -> “View/Modify” menu
The current configured VDisks are displayed as shown in the figure below
In the above figure,
- ID is a unique ID assigned by the system for the VDisk
- The Serial Number column displays the serial number assigned to the VDisk. This serial number is persistent across reboots and is used by clients to uniquely identify the VDisk. For example this serial number is presented to a client in the SCSI INQUIRY command for EVPD page code 0x80.
- Online column indicates whether a VDisk is online, offline or disabled. VDisks are usually offline when one or more configured disks containing the VDisk data are offline.
- Status column indicates the current features enabled for a VDisk. Features are explained below
- Clicking on the “View” link in the Stats column for VDisk displays its statistics.
To delete a VDisk click on the delete ![]() link for that VDisk.
link for that VDisk.
The features of a VDisk that can be modified are
- Name
- Size
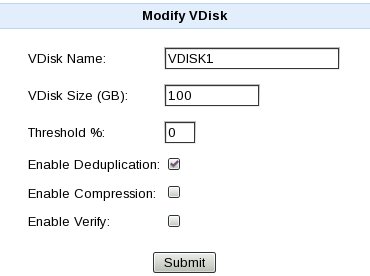
- Threshold (described below)
- Dedupe: Enable/Disable Deduplication
- Comp: Enable/Disable Compression
- Verify: Enable/Disable byte-per-byte verification of identified duplicate data. (Only valid if Dedupe above is enabled)
To enable/disable a feature click on the "Modify" link corresponding to the VDisk. In the next page as shown in the figure select the desired feature and click on Submit

VDisk Thresholds
Every VDisk is thinly provisioned. This gives the advantage of configuring a VDisk with a size far greater than the available physical storage size. However this also has the disadvantage that a write request may fail due to the lack of physical storage space. On such a condition a SCSI CHECK CONDITION response is sent for a write command indicating the lack of physical storage space. Certain applications/client may handle these conditions. For example ESXi may pause a VM (VAAI TP Stun). A threshold is an indication to a client that an out of space condition will soon be reached. For example for a 100 GB VDisk if the threshold is set at 20 % if the available space in the corresponding storage pool cannot ensure storage of at least 20GB VDisk data a notification is sent to the client on the next write command. The notification currently sent is a SCSI Unit Attention which may or may not be handled by a client. For example ESXi logs this event in it log file as
Space utilization on thin-provisioned device naa.6e8476f3bd7184ce9cda0210e9c97da8 exceeded configured threshold
If a SNMP trap destination is configured and the threshold is exceeded a SNMP trap will also be sent.
Resizing a VDisk
It is possible to increase the size of a VDisk (available since 3.0.4). To increase the size of a VDisk run the following command
/quadstor/bin/vdconfig -v <VDisk Name> -s <New size in GB>
For example
/quadstor/bin/vdconfig -v FOO -s 200
The above command will increase the size of VDisk 'FOO' to 200 GB
The size of the VDisk can also be decreased by passing the -f option
For example
/quadstor/bin/vdconfig -v FOO -s 20 -f
UNMAP behavior since ESXi 5.1
ESXi 5.0 automatically issued SCSI UNMAP for storage systems which supported it. Is ESXi 5.1 (and possibly future versions) ESXi no longer issues SCSI UNMAP automatically. UNMAP is important to thinly provisioned disk such as QUADStor VDisks for unused space reclaimation.
However it is possible to manually issue the UNMAP by a few simple steps
1. Login to the ESXi host
2. cd /vmfs/volumes/<datastore name>/
3. vmkfstools -y 99
In the vmkfstools command above 99 indicates the percentage of delete/unused blocks to reclaim.
Before running the manual reclaim please read the following links
http://kb.vmware.com/kb/2014849
http://blogs.vmware.com/vsphere/2012/04/vaai-thin-provisioning-block-reclaimunmap-in-action.html
Notes
1. The reclaim operation will create additional files. There should be available storage space in the storage pool corresponding to the VDisk for reclaim operation to succeed
2. The reclaim operation needs to be run prior to deleting a datastore
